Sorry, no summary for this folder.
This is the multi-page printable view of this section. Click here to print.
Sorry, no summary for this folder.
Wrong password / email
It is possible you entered a wrong password or email. Just check that both are correct and try again. If you forgot your password, you can click ‘Forgot password’, and a new password will be sent to you.
Account not activated
If you registered your account only recently, it may be that it was not activated. After registration, an email is sent to you, which contains a confirmation link on which you have to click in order to activate your account. You may have missed that.
Find email
Try to find that email in your inbox or in your SPAM folder, coming from ‘Mother Meera Team / Events’, and click on the link in that email, then you will be redirected to the login page, and your account is activated.
Send us an email
If you cannot find that email, send an email to our office through our contact page use the very email account, with which you have registered, as this will be a confirmation. We will then manually activate your account. Try to login a little later.
Send us an email:
For more information go to our website: Mother Meera Foundation
This means, you will not receive ANY email notifications in future from us at all, only transactional email, for example booking confirmations. If you have clicked the unsubcribe link by mistake, you can re-subscribe.
You can subscribe again, by logging in to booking.mothermeera.com with your email and your password (if you forgot your password, you can order a new one) and navigating to the “My-Subscriptions” section. Untick the box next to ‘Unsubscribe from all’ at the top of the page and then save. Alternatively you can also send us an email through our contact page
First resubscribe, as described above. Then tick or untick the locations on the list at the same page according to your wish and then save again.
You should have reach this page, because you have received an email.
We have imported your email and name from an older mailing-list, so that we can continue to send you email notifications about Darshan events, for example in different cities. At the same time, our system allows you to make bookings for darshans. Using your email address and the password we sent you, you can log in to our system to make a booking or change your details (name, country, email address, password, etc.). Instructions for booking can be found here .
You can unsubscribe from all emails by clicking the link at the bottom of the email or by writing to our office via our contact page .
This document is not indexed by search engines. See also:
Admin-tutorial for basic functions of the system admin, like manually register users.
Country Admin for more advanced options to manage sessions
There is also the email tab. It gives you several options to select emails from:
Mailinglists, select one or more, as available in our system
Filter sessions, set the dates and click on filter sessions
Select Sessions, you can hold the CTRL key and select sessions with the mouse to select multiple sessions
Export address CSV, instead of sending an email through the system, you can also export the data to a CSV spreadsheet.
Enter emails separated by comma. Copy / paste from an existing list, there should be no new lines in the list. Make sure all emails are valid, as mistakes will not properly indicated and may stop the process.
When you want to send out to your mailing-list, we recommend you click on all locations as described at 1.) and the export the list as CSV as described on 4.) above. Now open the CSV list in your computer and copy all email addresses into the recipient field, just like this.
The reason is, that if you just click on the mailing-list as under 1.) and send directly, certain emails will be filtered out. (probably all that did not explicitly click on agree, when asked, if they want to get newsletter. This may include many older subscribers!!)
Of course, you can choose any of the above options, or combine several, but generally speaking you are likely to use only one of the options. For example, you maybe on location, and anything regarding the Darshans changes, so you want to inform the people of a given session, in this case select only the sessions (3) and best filter them by date (2), so you can find them more easily.
For the unsubscribe link, we have this code: unsubscribeURL so this should be in the link, without http:// !! (Word always adds this, so always check this before sending out!) In case you forget to do this, our system will automatically add an unsubcribe link in 3 languages (English, German, French) by default. Here you have a chance to determine the look and feel for thisn option yourself. It might be usefull, before sending a mass-email, to send out a single mail to yourself first, so enter your own email, before selecting sessions or mailing-lists for a test. When you are satisfied, send out all.
After determening the number per hour (usually 1000 is safe), and you click on send, it will send 1000 per hour spread out equally during that time!
You will be automatically directed to a page showing you the progress report. There are also buttons to stop or pause the sending. You can always access this page if you click on email and then on mailing. From this page you can access the email tab by clicking on email. After the system has switched to the progress tab, there is no need to keep this tab / window open.
For example, if you have 10.000 emails to send, you can enter all the 10.000 email addresses into the recipient field, line separated or comma separated, press send, and the system will send the 10.000 emails at a rate of 1000 per hour. You can close your computer, and open it after 10 hours, click on email and the mailing, to see the progress.
If you want to first send a test mail to yourself, in order to get back to the email tab, go back the history two times, and you will have to re-format it, and maybe add again, the subject line and reply-to.
You can chose a sender address. Regarding choosing a sender, here comes the issue:
We have been white-labeling our domain from where we send emails, which is @mmdarshan.de. We can make any number of emails or aliases under this domain, like any-location@mmdarshan.de , and then redirect it to the email you want, for example MMTeam.mylocation@gmail.com , or info@mydomain.com .
This white labeling is very important, so that emails arrive properly, and we have only recently succeeded in doing it, so this works well. The email compose window makes HTML emails, and you can prepare in word or take it from a website, so you can also use images, and you should remote link images.
The protocols that are important in this context are called SPF and DKIM . While DKIM is taken care of by Sendgrid itself, the email address, or a whole domain for email addresses have been first given authorization that Sendgrid is a valid sender for the email address. This has been done by us for the domain mmdarshan.de. If you do not enter the correct values and authorization from sendgrid into your email domain SPF, you will be blocked by many email providers and downgraded or regarded as SPAM by others. Test your configuration by sending an email here . Make sure you achieve a high value. For example using a non authorized Reply-to will also downgrade your email. Using only HTML and not also text will also lower your score.
We do not recommend this function, it is complicated, and not in alignment with the GDPR rules which are now in-build into our system. It is mentioned here for completeness
There is still a function to import old mailing lists, and make everybody automatically a user, which is not in any menu or link, it is here http://registration.mothermeera.com/admin/userimport and expects a comma separated list, you have to paste into the field.
We initially used this as a way to send out mass-emails, following the process described above, selecting then the mailing-list in the email tab. But we do not recommend this process any more for three reasons:
You end up sending the double amount of emails, as you first send an import confirmation, and then send out the invitation.
People receive two emails, which is confusing.
People are being send a password to login. In other words, we do not give them the option to choose a password right from the beginning. Passwords sent out this way are usually cryptic, and some letters can be confused, so people may have trouble to login. They will also not remember such a password easily. Even though, anybody can change their password under profile, many do not know or do not do this. It just adds an extra layer of complication.
Therefore, we do not recommend the user-import function, if you start anew with our system, and are migrating from an older system. It is still worth considering using this function in one particular case:
After following the process below, I invite people directly to sign-up as users, without importing them, the people will become users, and by making reservations, will also be added to the mailing-list automatically. But some may not have done so. If you want not to lose these people, you could import them with their names, the email, and the location for which you want to add them. Make sure that an appropriate confirmation letter is installed on our system - it requires a system build for the whole system, which is a complicated process! So check back with us, before doing so.
The following is just a suggestion. You may find this to be too complicated, and of course you are free to do it your own way.
Send out two separate email versions: one for USERS, one for NON-USERS. Compare our lists in our system, with your old lists. Determine those who are already users in our list, and those who aren’t. Create two separate CSV files one for users and one for non-users. If you start out the list of non-users will be much larger than the users. Send a slightly separate email to each group. We have a common ’landing page’ giving all details and also a tutorial. The tutorial part starts here: Reservation-Guide
“Darshan are free, but reservations are required. To book darshan use the new reservation system. All the necessary information can be found here .” (this part is the same, for user and non-user)
For NON-USERS you continue:
“For a direct link to register, click here >”
(make this bold, the link given is this: http://registration.mothermeera.com/booking/register) . People who are NO-USERS will DIRECTLY land on the new user registration page, WITHOUT having to click one more time at the login page!! So the possibility for confusion is less. After submitting, they can directly choose Darshan sessions and register!
For USERS, you give a different link. First you tell them that they are Users, you know it:
“If you have received this email directly from us, you are already a registered user. You just have to log-in here >”
(this is the link, the login page: http://registration.mothermeera.com/booking )
Now you add a text for password-retrieval:
“If you have forgotten your password, click here> and enter your email address.”
(It is this link: http://registration.mothermeera.com/booking/reset _password)
This is the main thing, that the people are directed to the section, without having to think what to do. Of course, we give the general overview tutorial first as a link.
This document is not indexed by search engines. See also:
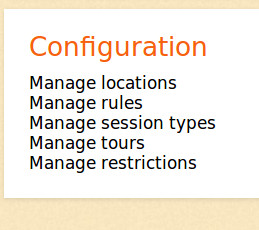
Manage locations: Here you can add or edit locations for Darshan.
Manage tours: Here you can set limits to how often a person can visit within a range of Darshan sessions.
Manage rules, session types, restrictions: These are parameters that work system-wide and should not be touched by the country Admin, as they affect the whole system. For example we can determine how many bookings a person can make generally in advance etc.
Go to configuration and then manage locations. You can edit the location for your city. Usually, you will take the name of a larger city as a kind of landmark, since this also will create a mailing-list for that location, but you can also edit it to change the name. Be aware that the location name appears within the system together within the session-type, so don’t make it too long. Make sure that ’external system link’ there has no entry, so that the location becomes functional.
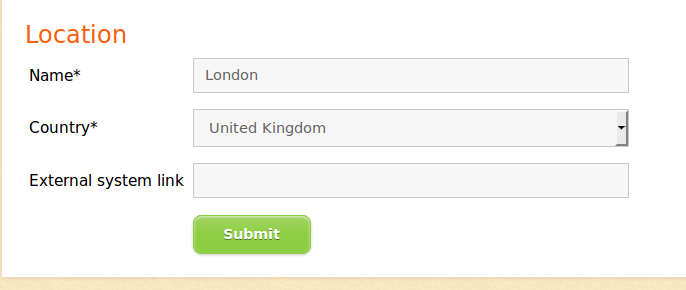
Each location has now two new fields:
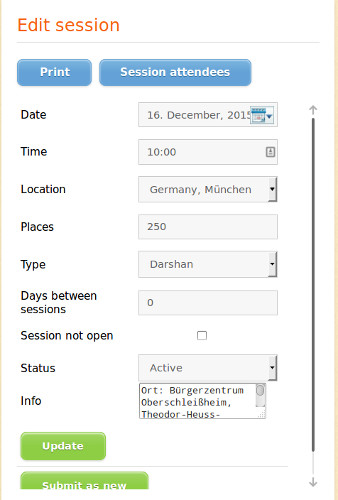
Then go to manage sessions, and make a new session. Enter date, time, select location. You might give 0 as ‘Days between session’. If you enter a number, it means the person cannot do any booking so many days before and after the session. Generally it is best to manage these limitations through the tour parameter.
Status: ‘Active’ means that the session will be bookable until the limit is reached. If darshans get canceled, you can use ‘postponed’ rather than ‘canceled’ as we prefer to call it that way. Type is usually Darshan. ‘Session not open’ means you lock the session, then not admin or user can change dates in the session. You could do this if you want to announce Darshans and make them visible via the calendar, but not bookable. Sometimes the Darshans are on hold, you don’t want further bookings, but they are not canceled either, then this is an option. It also matters not to loose registrations.
Update: use if you make changes to a session. Submit as new: Just overwrite an existing session with a new date or time, and submit as new, so you don’t have to fill out all details each time.
Also, here is a test-environment, that you could use and play around with, check with us, that we open it, as it uses resources. It is here: http://stg-registration-mothermeera.jelastic.dogado.eu/booking If you send out anything through the test environment, you will need to use mailtrap to see it: (Get credentials from us by email), as the emails from the test-environment, will not be sent out to real email addresses.
There is a limit to the emails for the mailtrap, so you have to empty the trash every now and then.
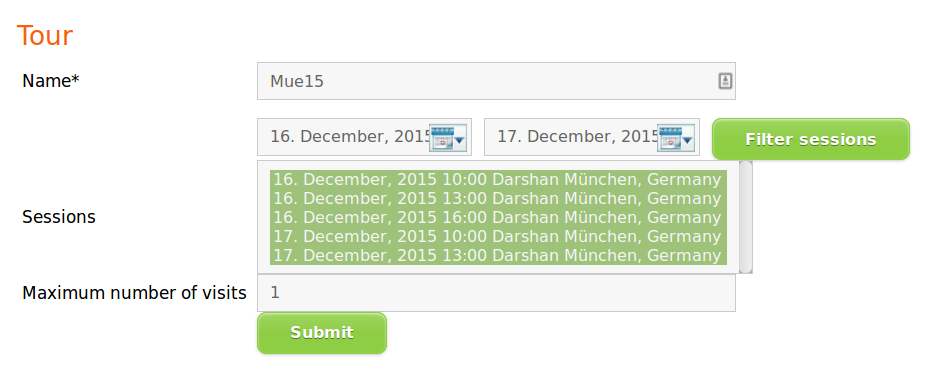
For a given location, you can also enter several tour-parameters. For example, if you want that people can also attend on a second day, you create a new tour, and add the sessions for each day, to the two tour parameters. You might want to choose a name that is similar, like London16.1 and London16.2. It is even possible to create a 3rd tour (London16.3) if you want to restrict the second attendance to a certain time, say 10 am. (In this case London16.3 would contain all sessions except 10am, with attendance set to 1)
Please also see mass-email about using the systems email function, and exporting data, like mailing-lists and attendees per session.
This is a tutorial for Admins for our registration system - if you are not an admin, you shouldn’t be on this page (this page is not search-able through search-engines)
After you login, you will see Admin at the top level menu. This will bring you to the previous layout, with the search page with several fields.
Since we redesigned the whole reservation system, the admin mode still retains the old design, but there are a few changes. For example if you see names in fields with grey background, it means that the persons are not users.
If you are a local administrator, who got an email from a person, it is best you search for this email, just first part of the email is usually okay. Names may be wrong, as we imported mailing-lists from the old system, and the email may have been attributed to a wrong name.
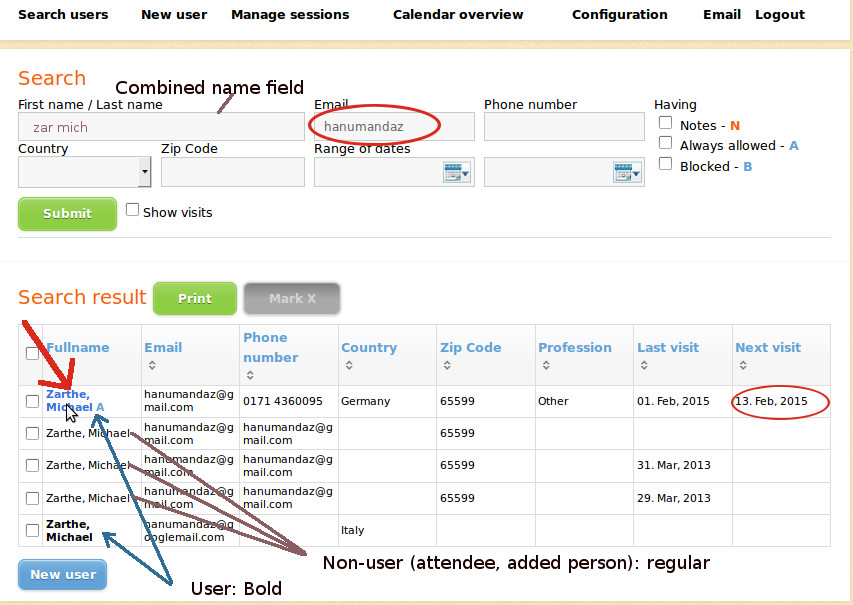
The first name /last name field is a combined field, it is usually good to search for first letters of last and first letters of first name, as seen above. But search either for email or name. You can select also for a range of dates, if you select for a day, both fields will show the same date. Do not do this too often, as it takes long time to load, and it may strain the system.
When you get the search results, as seen above, a list of names appear. These are only the search results, from there you have to select the account of the proper person. To do so click on the name. You will see that some people have several accounts. Whatever is without grey background, is a User account, people with grey background, are instances where people are booked as attendees under a different persons name. So, to make a booking, best use the user account, and check if it is the email, the person uses.
If there is a booking to be changed, check the last column, as it displays the next visit. Then click on the name of the person, that has the upcoming visit. You cannot make any changes in the search results! Each user is tied to one particular email, and each email can only be used one time for a user. For attendees (non-users) emails can be used multiple times, but to do this makes no sense really, and unless it is the persons real email, it is better to just use the names.
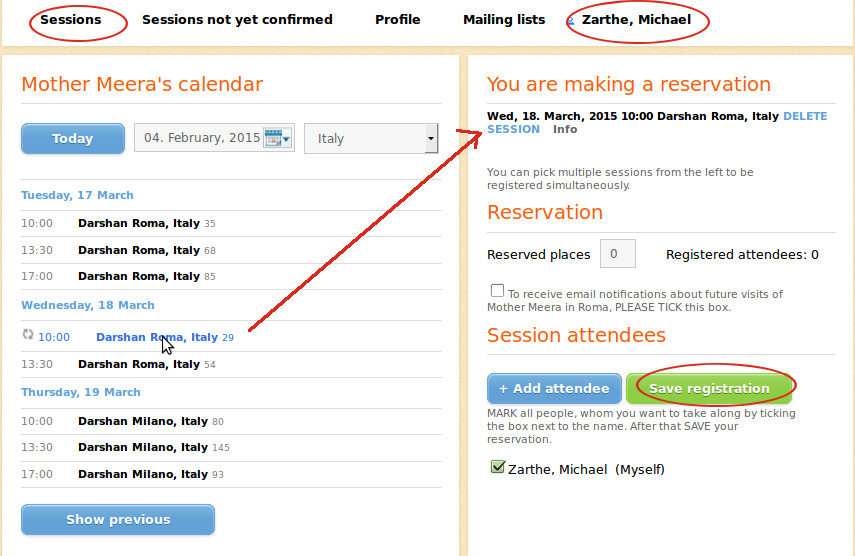
After clicking on the name, you see the sessions of the person, and can book sessions or do any actions, as you are used to do, when you make a booking for yourself. See the circled name on the top, so you know, for which person it is. To see the email of the person, you have to click on profile. If you have not yet completed a booking, but have switched to profile or somewhere else in between, you can click on ‘sessions not yet confirmed’ to see if there are pending sessions. Or return to ‘sessions’ to continue to make bookings. You can also add attendees, and make sure for all attendees the box in front of the name is ticked, and then save the registration. It is also possible to tick only the name of the attendee and not the user, if only one person comes, who doesn’t have an account, and the user for example comes at a different time.
If you click on the name of a non-user (grey background), you will land at the page of another user, that is the user who added him. Before you click on the non-users name in the search field, note when the person has the next visit. Then, when you land at the users page, who made the reservation, click on that session on the right side, and the person should show up under the users name. There is an edit option behind the name, so that you can make changes, but you will only see this, after clicking at a session this person was / is registered.
Under the search results is a blue button ‘New user’. If a person can not be found, or somebody phones who does not have an email, you can press it to make him a new user, you only fill out the name, country, zip code, whatever you know, or phone number, to more easily identify the person, and then can make bookings for the person, even without email. Of course, if the person has an email account, you should fill it out, as it is the most important. There is no password option here - so submit it. To give the new user a password, go into his profile, after you created him.
Below is the profile view. Here you can check the email address, and also change it. Very often people complain, that the password does not work. Change the password to something simpler, you can use their first name and a number or a word like darshan. Keep it simple, this is not a high-security account, no money is involved :-) Then you can send people the new password, telling them that they can again change it, in their profile, if the want. They will usually be happy. In general, make the appointments people want, and then give them an easier password (if they couldn’t log in) as a second step.
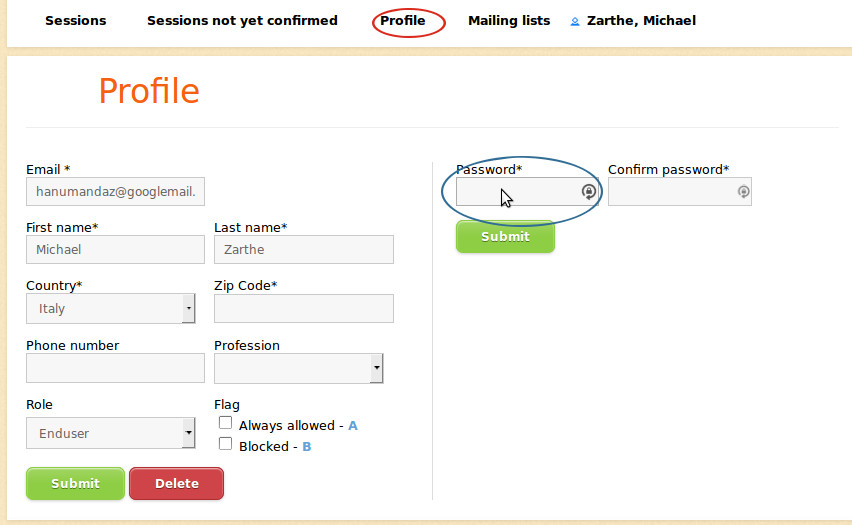
There is now a new field under Profile. You will find it on the left column below profession. There will be several Flags (Markierungen), and select-boxes next to it.
If you just created the account, it will not be activated. That means that the user cannot login himself. If you are sure that it is a correct email, for example because you received an email from the person, than click on the select-box next to active, and than click the green save button below.
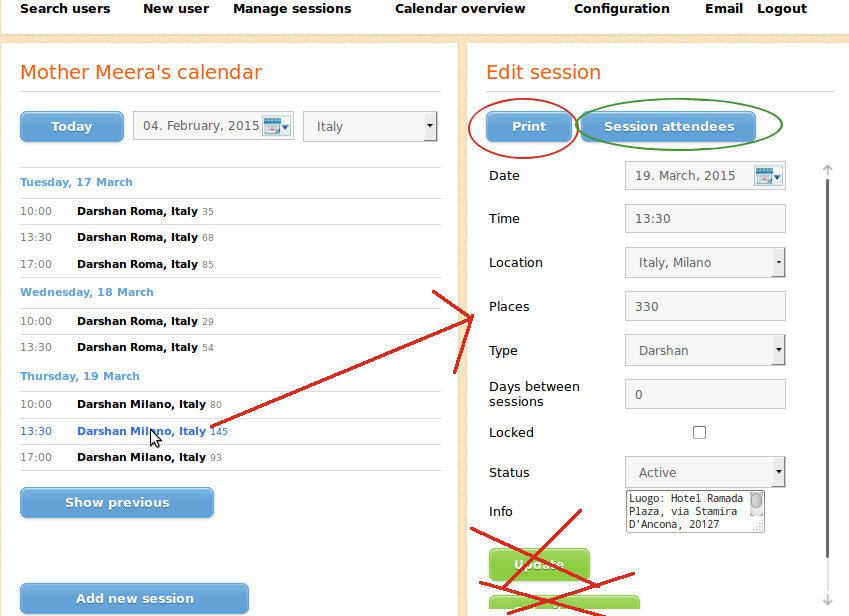
You only go to ‘Manage sessions’ if you want to print out the checkin-list. To do so, under ‘manage sessions’, click to the left on the date you want to see. then to the right, you see all the data of the session, like the time, name, and limits, the text of the info-box. As a local admin, you should not touch these, never click on ‘save’ below or ‘save as new’, **never click the green buttons at the bottom here, ** as this will create a new session with the same name, and it will confuse people,
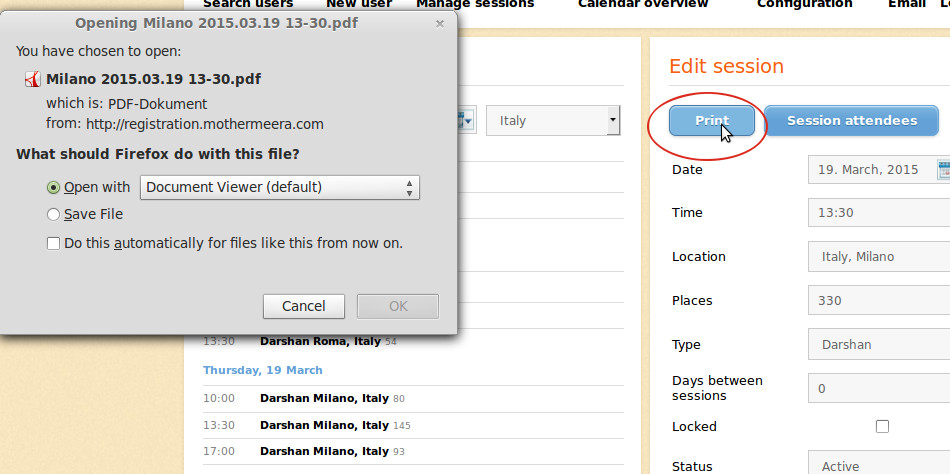
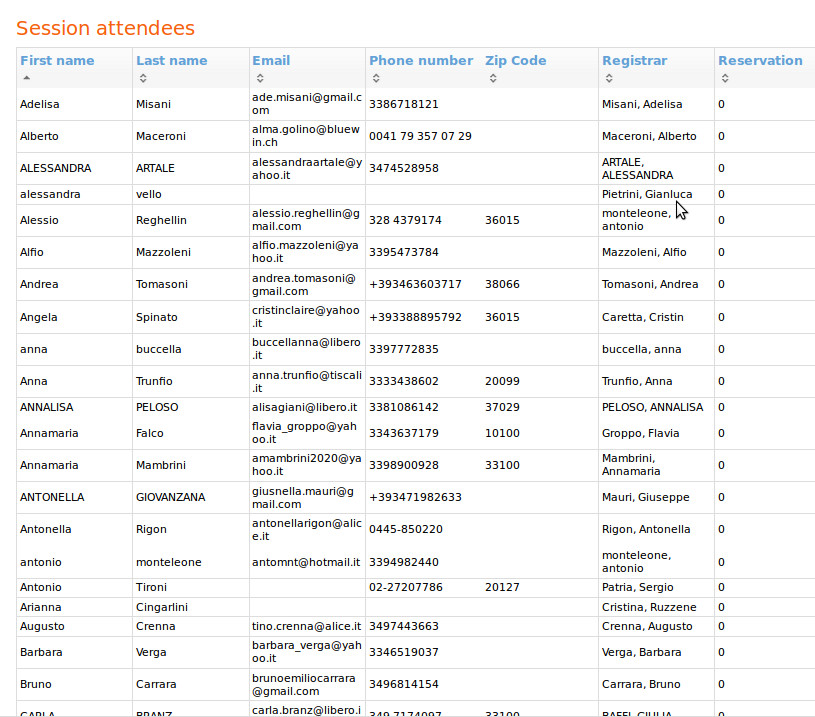
To print out or simply view the check-in list, click on Print, the blue button at the top. If you click on ‘Session attendees’ it will give you a table, which you can select all ,and the copy / paste to a spread sheet. (see last image). The blue buttons at the top right side are safe for you to use!
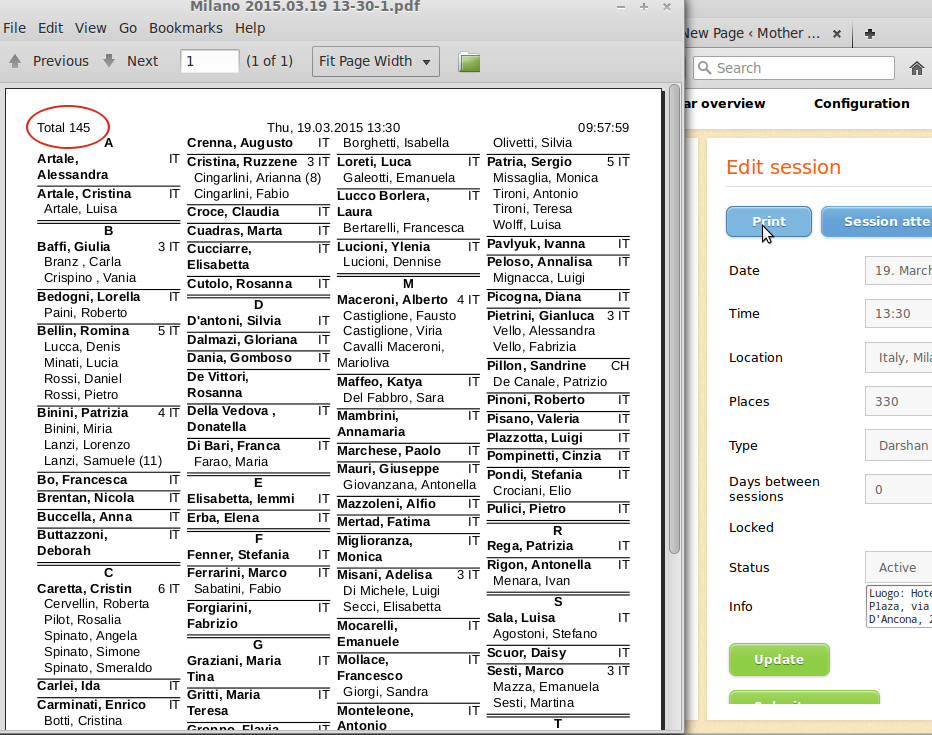
If you click on Print you get your usual dialogue, that lets you either save or display the Check-in list. It is a well formated PDF file.
Sessions will close automatically once they are full, and the will reopen automatically also if people cancel. You will see the count down of the last 30 behind each session, to see how many places are available, at the normal sessions view of each person. Here in this check-in list, people are listed under the person who made reservation. people who print out their ’tickets’ don’t have to be checked in by the list, for other’s you may have to ask, who made the reservation.
If you like to list everybody alphabetically, you may use the ‘session attendees’ option, above, and get a HTML spreadsheet. See the image more below.
At the top right there are several signs and numbers:
The display is something like this:
T 200 X/N/C 0/15/7
This would be 200 visitors total, 0 marked X, 15 new, 7 children.
Below is the ‘session attendees’ spreadsheet for one session. If you want to make your own check-in list, it is advisable, to copy /paste all the results into a regular Excel or Open-Office spreadsheet, delete all rows that you don’t need for check-in. You may reverse the two first columns, to display the last name first, and then print it out in columns, and of course sort it before according to last name (or also first name, if you prefer).
If a person asks to un-subscribe and not receive any emails anymore, go to ‘mailing-lists’. There, at the top is an option ‘Globally unsubscribe’. Tick this box and then submit to save, and this person will not receive ANY mass-email notifications anymore, but he will receive transactional emails, that means confirmations about Darshan dates he makes. If the person asks to be notified about a particular city, tick the box before that city, make sure that Globally unsubscribe is not ticked and then submit to save it.
The ‘Globally unsubcribe’ option will be automatically ticked, if the person clicks the unsubscribe link in the mass emails. This will be removed from the mailing-list only when we send emails through our own ’email’ interface of the system.

You will find our application form here >
Dear Friends, this is an informal general direction for those who like to conduct a Mother Meera Meditations: