Admin-Tutorial
This is a tutorial for Admins for our registration system - if you are not an admin, you shouldn’t be on this page (this page is not search-able through search-engines)
NEW:
After you login, you will see Admin at the top level menu. This will bring you to the previous layout, with the search page with several fields.
Since we redesigned the whole reservation system, the admin mode still retains the old design, but there are a few changes. For example if you see names in fields with grey background, it means that the persons are not users.
If you are a local administrator, who got an email from a person, it is best you search for this email, just first part of the email is usually okay. Names may be wrong, as we imported mailing-lists from the old system, and the email may have been attributed to a wrong name.
Attention:
The screenshots were made before the redesign, the non-users = attendees are now marked with a grey background.Searching
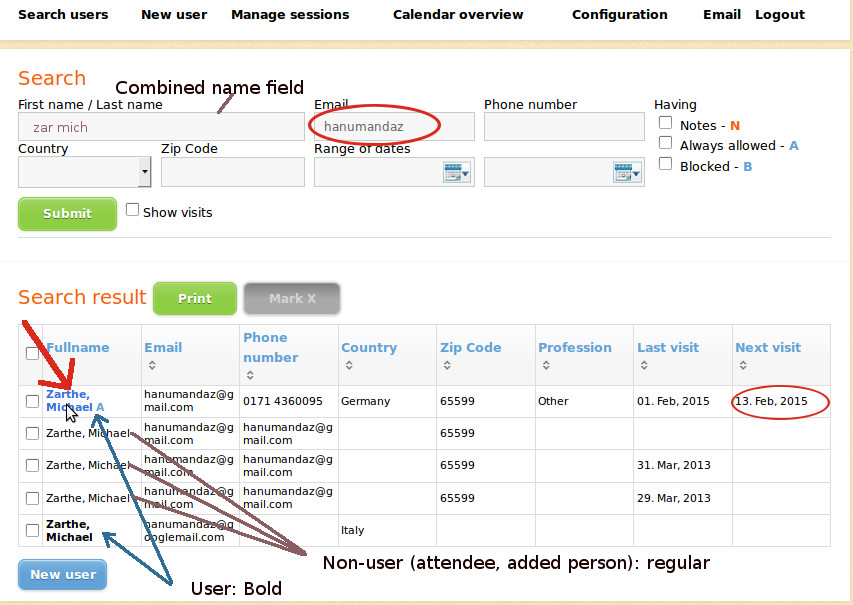
The first name /last name field is a combined field, it is usually good to search for first letters of last and first letters of first name, as seen above. But search either for email or name. You can select also for a range of dates, if you select for a day, both fields will show the same date. Do not do this too often, as it takes long time to load, and it may strain the system.
When you get the search results, as seen above, a list of names appear. These are only the search results, from there you have to select the account of the proper person. To do so click on the name. You will see that some people have several accounts. Whatever is without grey background, is a User account, people with grey background, are instances where people are booked as attendees under a different persons name. So, to make a booking, best use the user account, and check if it is the email, the person uses.
If there is a booking to be changed, check the last column, as it displays the next visit. Then click on the name of the person, that has the upcoming visit. You cannot make any changes in the search results! Each user is tied to one particular email, and each email can only be used one time for a user. For attendees (non-users) emails can be used multiple times, but to do this makes no sense really, and unless it is the persons real email, it is better to just use the names.
Making bookings or changes
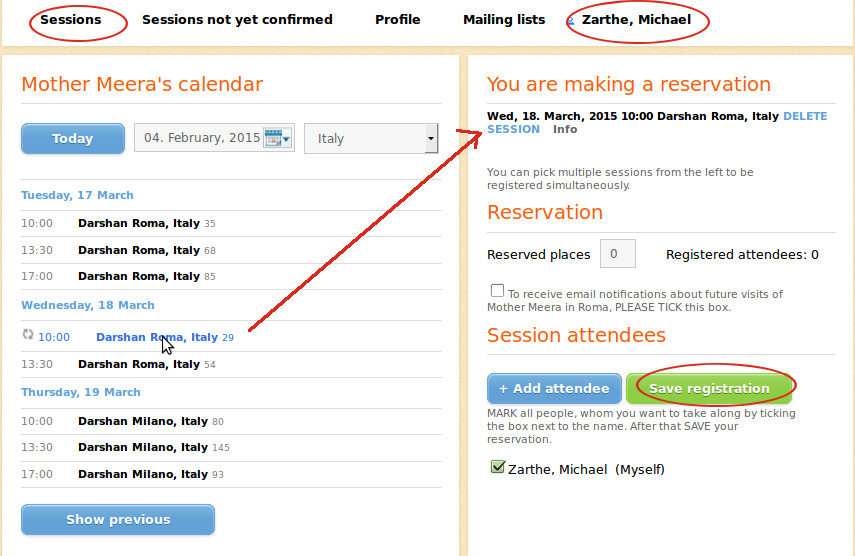
After clicking on the name, you see the sessions of the person, and can book sessions or do any actions, as you are used to do, when you make a booking for yourself. See the circled name on the top, so you know, for which person it is. To see the email of the person, you have to click on profile. If you have not yet completed a booking, but have switched to profile or somewhere else in between, you can click on ‘sessions not yet confirmed’ to see if there are pending sessions. Or return to ‘sessions’ to continue to make bookings. You can also add attendees, and make sure for all attendees the box in front of the name is ticked, and then save the registration. It is also possible to tick only the name of the attendee and not the user, if only one person comes, who doesn’t have an account, and the user for example comes at a different time.
If you click on the name of a non-user (grey background), you will land at the page of another user, that is the user who added him. Before you click on the non-users name in the search field, note when the person has the next visit. Then, when you land at the users page, who made the reservation, click on that session on the right side, and the person should show up under the users name. There is an edit option behind the name, so that you can make changes, but you will only see this, after clicking at a session this person was / is registered.
New users
Under the search results is a blue button ‘New user’. If a person can not be found, or somebody phones who does not have an email, you can press it to make him a new user, you only fill out the name, country, zip code, whatever you know, or phone number, to more easily identify the person, and then can make bookings for the person, even without email. Of course, if the person has an email account, you should fill it out, as it is the most important. There is no password option here - so submit it. To give the new user a password, go into his profile, after you created him.
New Password
Below is the profile view. Here you can check the email address, and also change it. Very often people complain, that the password does not work. Change the password to something simpler, you can use their first name and a number or a word like darshan. Keep it simple, this is not a high-security account, no money is involved :-) Then you can send people the new password, telling them that they can again change it, in their profile, if the want. They will usually be happy. In general, make the appointments people want, and then give them an easier password (if they couldn’t log in) as a second step.
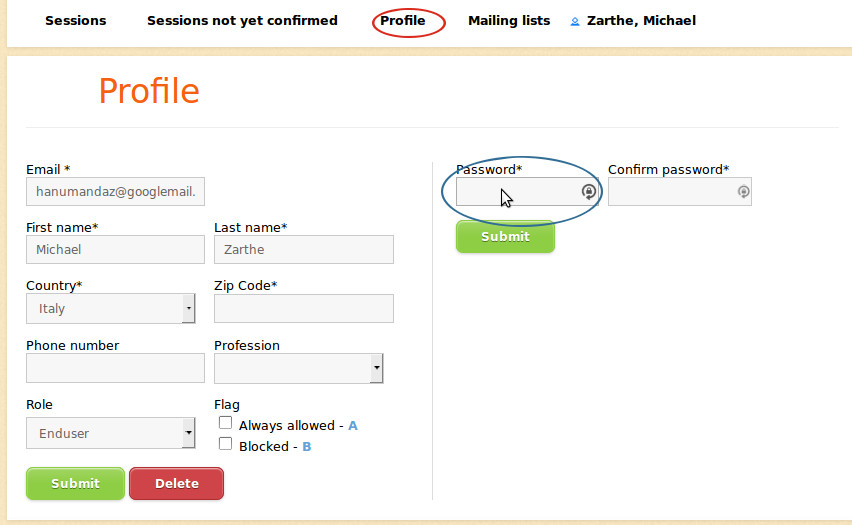
New:Activate account
There is now a new field under Profile. You will find it on the left column below profession. There will be several Flags (Markierungen), and select-boxes next to it.
If you just created the account, it will not be activated. That means that the user cannot login himself. If you are sure that it is a correct email, for example because you received an email from the person, than click on the select-box next to active, and than click the green save button below.
Print Checkin-list
You only go to ‘Manage sessions’ if you want to print out the checkin-list. To do so, under ‘manage sessions’, click to the left on the date you want to see. then to the right, you see all the data of the session, like the time, name, and limits, the text of the info-box. As a local admin, you should not touch these, never click on ‘save’ below or ‘save as new’, **never click the green buttons at the bottom here, ** as this will create a new session with the same name, and it will confuse people,
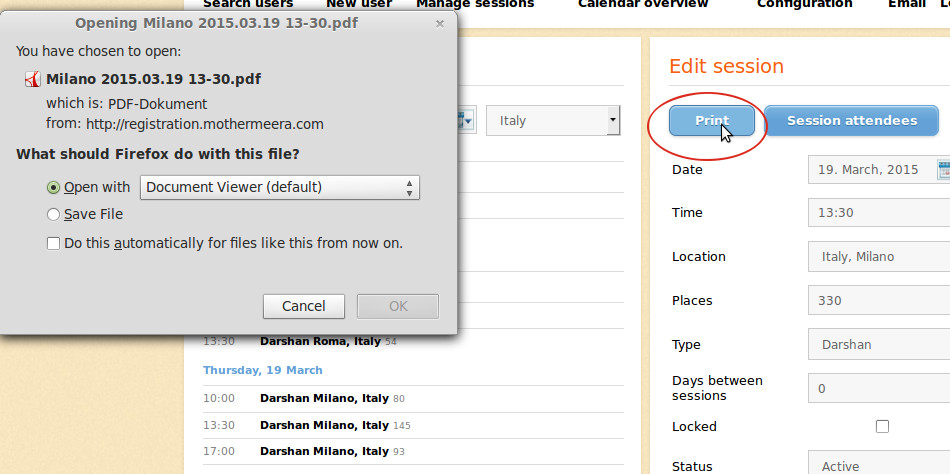
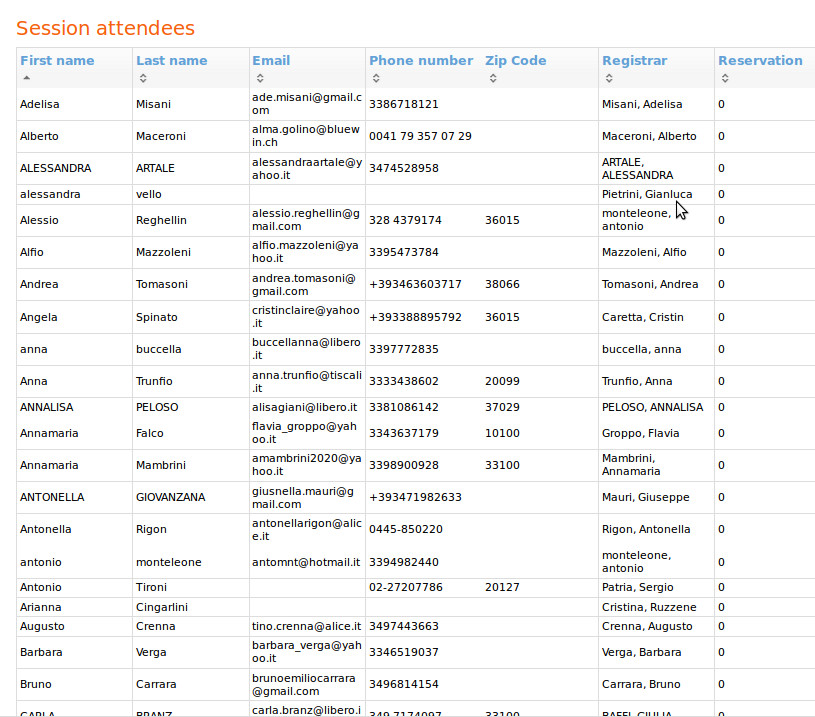
To print out or simply view the check-in list, click on Print, the blue button at the top. If you click on ‘Session attendees’ it will give you a table, which you can select all ,and the copy / paste to a spread sheet. (see last image). The blue buttons at the top right side are safe for you to use!
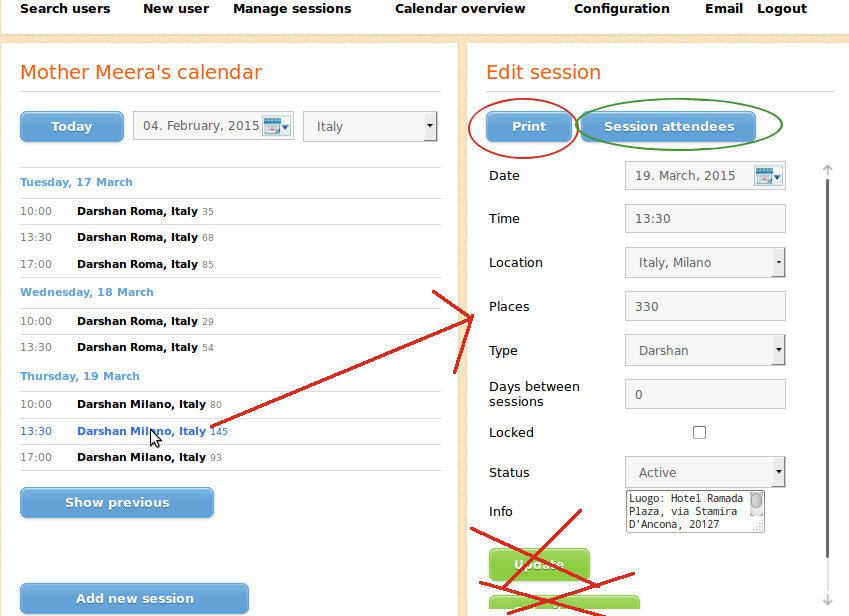
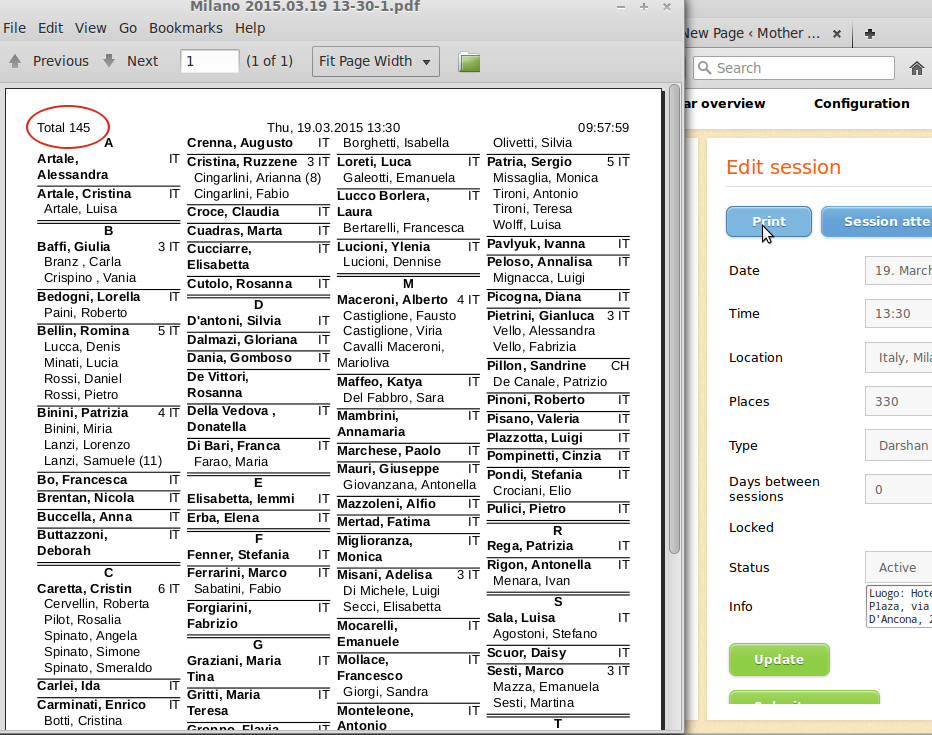
If you click on Print you get your usual dialogue, that lets you either save or display the Check-in list. It is a well formated PDF file.
Sessions will close automatically once they are full, and the will reopen automatically also if people cancel. You will see the count down of the last 30 behind each session, to see how many places are available, at the normal sessions view of each person. Here in this check-in list, people are listed under the person who made reservation. people who print out their ’tickets’ don’t have to be checked in by the list, for other’s you may have to ask, who made the reservation.
Different sorting for Check-in lists
If you like to list everybody alphabetically, you may use the ‘session attendees’ option, above, and get a HTML spreadsheet. See the image more below.
NEW
At the top right there are several signs and numbers:
- T = total number of attendees
- X = Only used at Schaumburg
- N = Amount of new accounts (Names will be matked with N. We don’t know if the people marked with N are really first time visistors, we just know they have created a new account, but we can ask them)
- C = Amount of children. You will find a number in parenthesis behind the name of children, which is their present age.
The display is something like this:
T 200 X/N/C 0/15/7
This would be 200 visitors total, 0 marked X, 15 new, 7 children.
The Spreadsheet
Below is the ‘session attendees’ spreadsheet for one session. If you want to make your own check-in list, it is advisable, to copy /paste all the results into a regular Excel or Open-Office spreadsheet, delete all rows that you don’t need for check-in. You may reverse the two first columns, to display the last name first, and then print it out in columns, and of course sort it before according to last name (or also first name, if you prefer).
Subscribe or unsubscribe
If a person asks to un-subscribe and not receive any emails anymore, go to ‘mailing-lists’. There, at the top is an option ‘Globally unsubscribe’. Tick this box and then submit to save, and this person will not receive ANY mass-email notifications anymore, but he will receive transactional emails, that means confirmations about Darshan dates he makes. If the person asks to be notified about a particular city, tick the box before that city, make sure that Globally unsubscribe is not ticked and then submit to save it.
The ‘Globally unsubcribe’ option will be automatically ticked, if the person clicks the unsubscribe link in the mass emails. This will be removed from the mailing-list only when we send emails through our own ’email’ interface of the system.
